[ Skip to Content ]
Go to the Red and Rosy home page

Red and Rosy

Discover my handmade, unique, bespoke creations. Lovingly crafted with felt, fabric & yarn. They make amazing gifts for all ages. See what we have that can make you the best gift giver of all time!

Older Posts, Page 3 of 14

Crochet BMO Scarf Tutorial
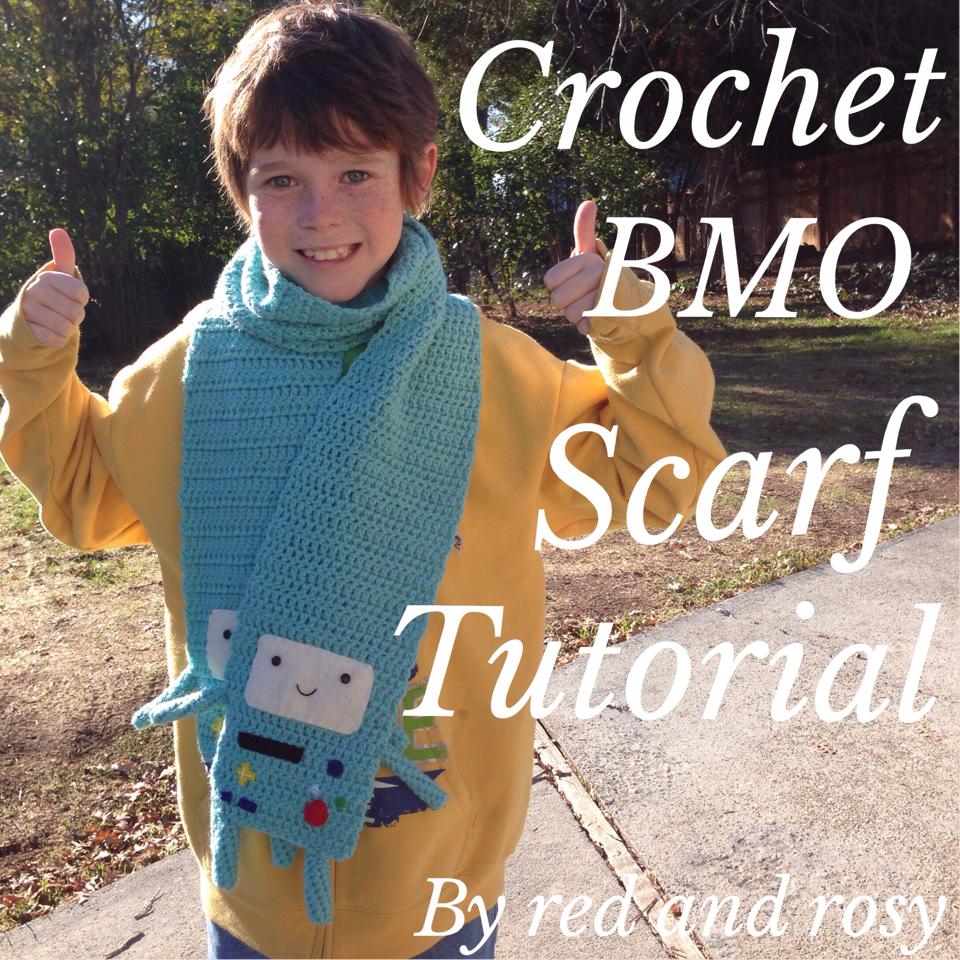
An adventurous tutorial crocheted by Rose Henderson on
My son Jack with his crochet BMO scarf (from Adventure Time) made by Red and Rosy

A few months ago, my 9 year old asked me if I could make him a Scarf that no–one else had at School. We compiled a list of his favourite TV programmes, had a look around to see what was available in local stores and whittled the list down to BMO from Adventure Time.

Before I go on, I would just like to let you know that I only learned how to Crochet a year ago, self taught through various Library books and the occasional YouTube tutorial. This is my very first attempt at writing a pattern, so please let me know if you spot any errors or if any part of this doesn’t make sense. All crochet terms are US.

Materials required

  • 1 Skein of Aqua Yarn (I used Red Heart Super Saver Aruba)
  • H Hook (5.00mm / UK 6)
  • F Hook (3.75mm / UK 8 or 9)
  • Yarn Needle
  • Scraps of felt in cream, red, royal blue, light blue, black, green & yellow
  • Print of attached PDF template
  • 4 x Brads
  • Embroidery floss to match felt colours

Scarf

All crochet terms are US.

  • Row 1 — Using H Hook, Ch 22. Turn, and DC into 2nd stitch from hook. Continue for the rest of the row. Turn.
  • Row 2–129 — Ch 2, DC into 2nd stitch from hook for rest of the row. Turn.
  • Row 130 — Ch 2, DC into 2nd stitch from hook and continue for rest of the row. Fasten off.

Arms (Make 4)

  • Using F Hook, make a magic circle and SC 5 into the ring.
  • Mark your last stitch with a stitch marker, then SC 5 for the next 12 rows. Fasten off, leaving a large tail for stitching to the scarf later.

Legs (Make 4)

  • Using F Hook, make a magic circle and SC 7 into the ring.
  • Mark your last stitch with a stitch marker, then SC 7 for the next 9 rows. Fasten off, leaving a large tail for stitching to the scarf later.

PDF

Using the attached PDF, cut out felt pieces as marked.

Now for the fun bit!
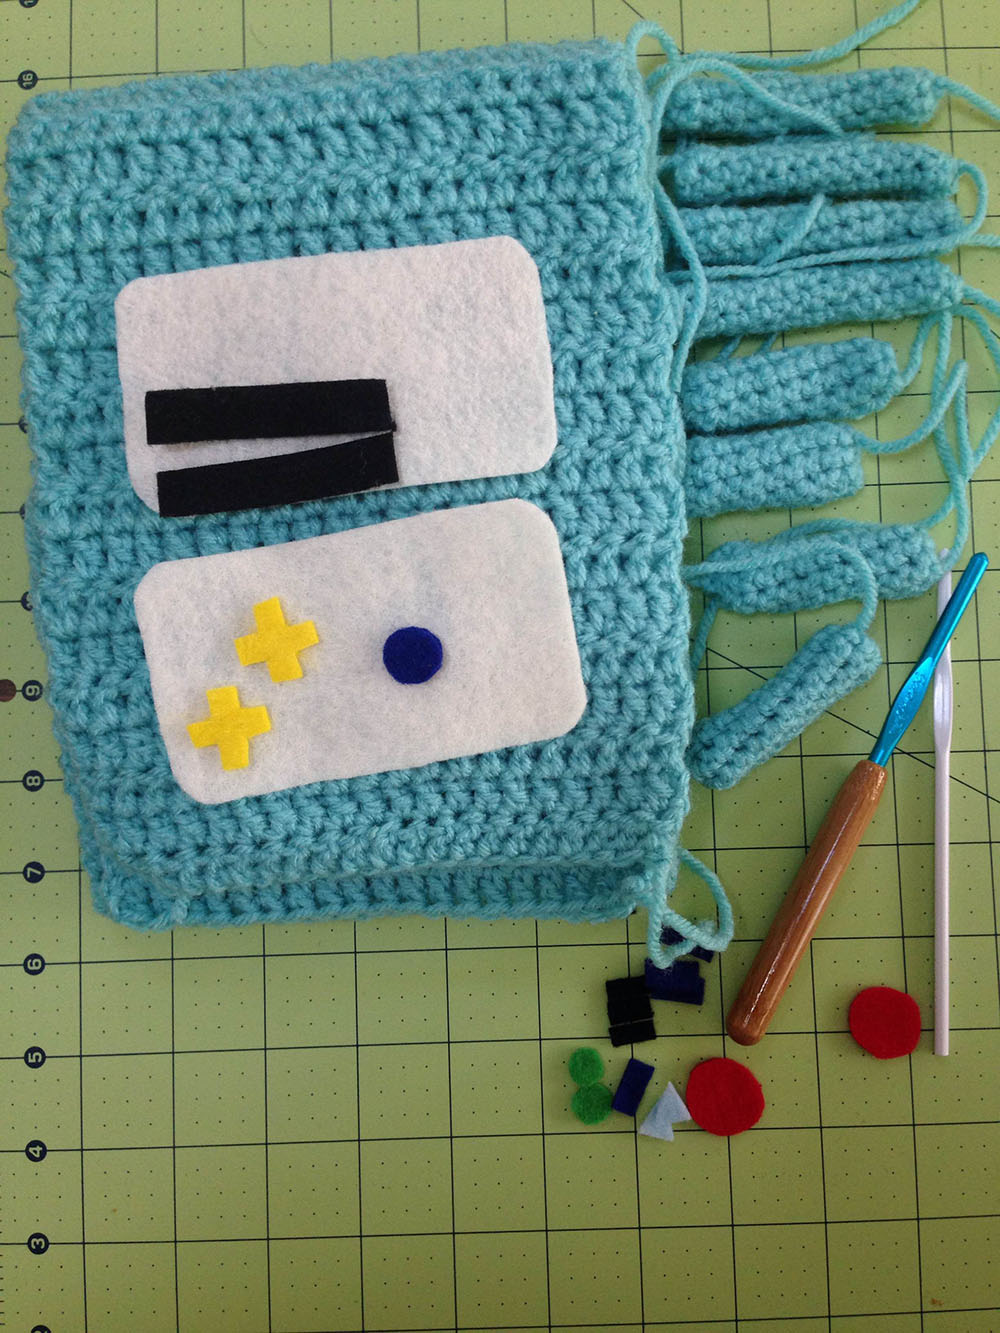
BMO scarf ready to sew

First, place the pieces at the end of the scarf as pictured below:
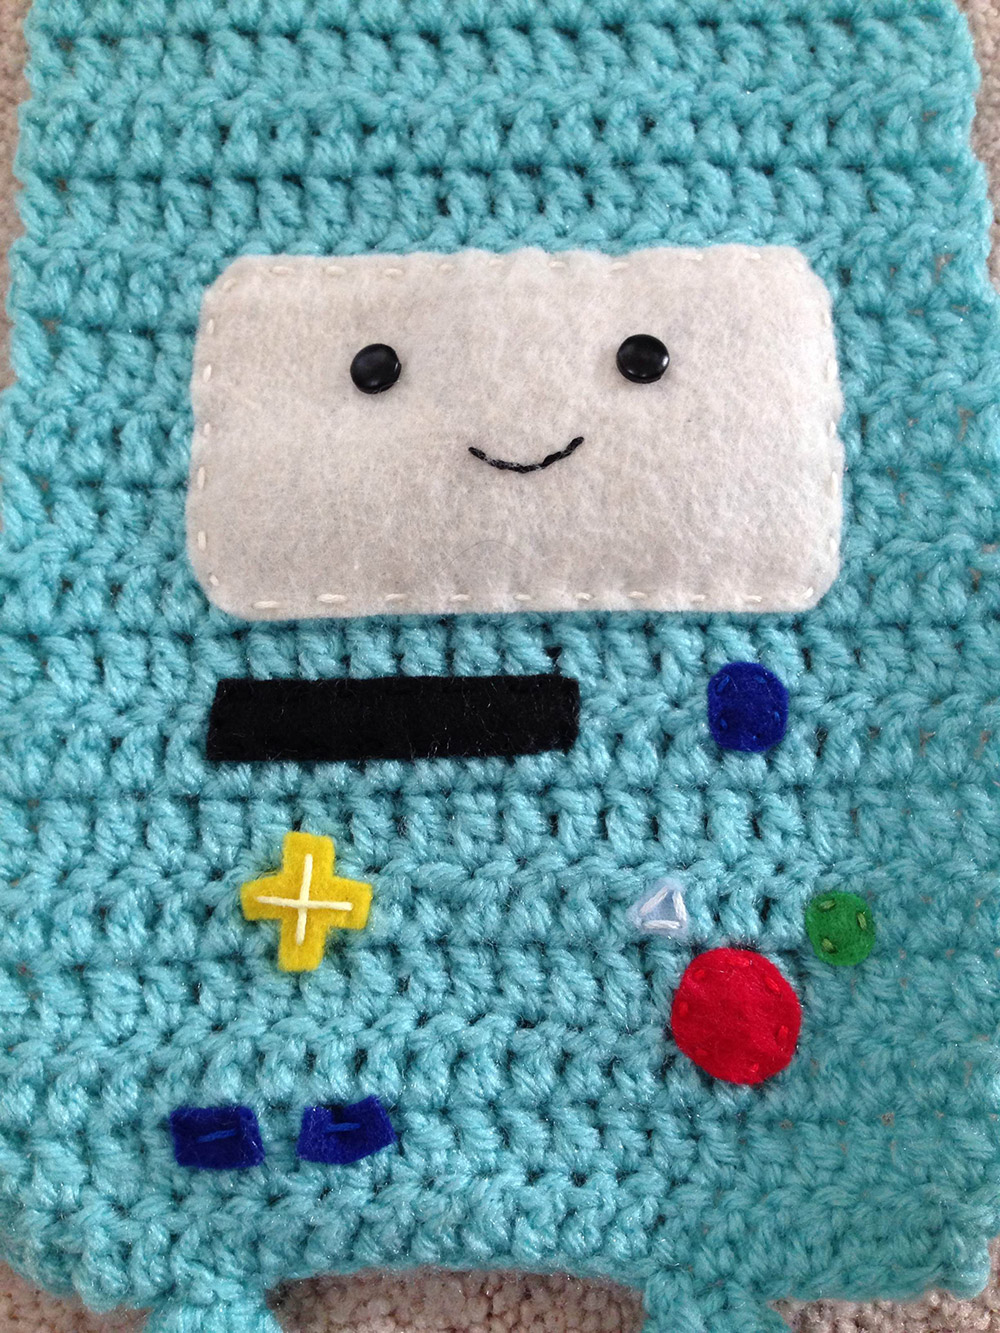
Close up of BMO scarf

Attach the brads to BMO’s screen to make eyes, and using a running stitch detail the mouth. Then, stitch the screen onto the scarf using matching embroidery floss (or not, depending on what you have in your stash).

I then attach the arms and legs using the yarn needle and a whipstitch, placing them where I feel they look "right". Have a go and trust your instincts!

Finished!

Ta–Da! Now you should have one fantastic looking BMO scarf ready for that special Adventure Time fan in your life.

As I said at the start, this is my very first Crochet tutorial, your feedback on any mistakes, parts I miss out or sections that just make no sense at all would be very much appreciated.

Back in the Saddle

A note written by Rose Henderson on

Hello there! Well, its been a while! Settling into living in California was a little more difficult than we originally anticipated, but over the past month or so things have all started to click into place and I have been able to start again with crafting and creating.

During my absence I have experimented a little with embroidery hoops, taught myself to crochet and explored every craft shop I could possibly find as well as sticking with my old favourite, felt.

I have a number of Tutorials waiting to be published over the next few weeks, and hopefully I will start using the Blog a little more.

Toby, Jack, Noah & I at the Golden Gate Bridge, San Francisco, California, USA

Thanks for reading.

An Update on our Adventure

A note written by Rose Henderson on

Well, it’s once again been a while hasn’t it? Apologies again, although I can genuinely hand on heart say that it has been one of the busiest times of our life!

So, what’s happened since August 5th?

Firstly and most importantly our Visa documentation was approved! On Wednesday Ed and I flew to Belfast for our face to face interview, which went well. On Saturday morning our passports arrived with our shiny USA visa’s safely attached inside — hooray!

Secondly, our house sale concluded (after sixteen months and four buyers) and on Monday just past we moved out of our home of five years and into a caravan, our temporary accommodation. I’m not going to lie to you, it’s a challenge. It’s a lovely static caravan and is perfect for a holiday, but going from our old (and in my opinion very spacious) home into a two bed caravan has been, well, interesting. But it’s short term.

We are now on the sad part of our adventure — we leave two weeks today and our days are filled with last visits to places and goodbyes. Leaving drinks are being organised, the boys are having a leaving party next week with a handful of their closest friends and close family goodbyes have almost all been arranged.

I will be updating the Blog more frequently now as we are finding our days less full as we get more organised. If you want to follow our new adventure remember to follow me on Twitter (@redandrosyhq) or on Instagram (@redandrosy) which is updated far more frequently than the Blog. To be honest, Instagram is updated many, many times a day!

Thanks so much for reading.

Rose ×××

The End of a Chapter

A note written by Rose Henderson on

So I’ve finally done it (well, I did it two weeks ago, I’ve only just got round to writing this post). I’ve closed my business officially with the tax office. Red and Rosy no longer sells creative, bespoke handmade gifts and can no longer make any money of any sort. It’s quite refreshing to be honest, I thought I would be really upset but I feel as though a huge weight has been lifted from my shoulders.

I’m not going to lie to you — it’s been a tough few years. I’ve only had a handful of negative experiences, but I’ve also had the pleasure of meeting many lovely crafters and customers and I can honestly say it’s been a pleasure.

So — for those of you who didn’t know we are off on a big, new adventure. My husband has a new job based in San Francisco and we are moving to Marin, which is just over the Golden Gate Bridge. I will eventually get Ed (the Web Superhero) to amend my website to make it less "selling" and more "family adventure". We are still in the UK, and still visa-less for the moment but we have finally sold our house after 16 months and four buyers having to pull out, and we are almost ready to go. Our home is slowly getting emptier, and in the next month or so we will be leaving our home and moving into temporary accommodation until we leave.

It would be lovely you would like to follow our adventure — in addition to (trying) to Blog more you can also find me on Twitter (@redandrosyhq), Facebook and if you are on Instagram come and say hi, you can find me at @redandrosy. Right now my Instagram is full of pictures of the kids and our “final visit” to places around Edinburgh & East Lothian, but soon it should be full of San Francisco, Marin and our many new adventures (Disneyland is the first promised place to vacation to!)

Thanks again to everyone who have left comments, interacted and purchased items from me and here’s to my family’s big new adventure!

Teeny tiny sewing machine

A note written by Rose Henderson on

Way back at the start of April, my lovely, trusty, 18 month old sewing machine decided to give up on me. On the weekend I ran a promotion for my Name Banners, meaning I had 38 to make.

It just wouldn’t work — the hand wheel was very stiff to turn, the needle kept sticking and an error message kept coming up on screen that indicated that the bobbin was tangled, when there was no problem with it at all. I spent four hours trying to figure out how to fix it — I cleaned out the bobbin case, I was only able to remove part of the needle plate to clean underneath, I switched it off and back on again (after all, it’s computerised and isn’t that how you fix computers?) and nothing. All the Name Banners were cut out and piled up neatly on my dining table and I had nothing to sew them with.

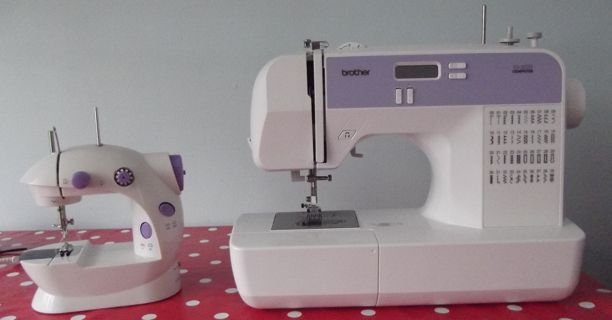
I was about to send my husband to Argos to pick up a spare machine for £150 when my lovely Facebook friend Lyndsey suggested the little Hobbycraft Machine, which was for sale at £24.99. Desperate, Hubby was sent there instead and came back with this:

Hobbycraft machine v’s brother machine

So yeah, it’s tiny. Teeny weeny. And reading the one review on the Hobbycraft website, it really wasn’t going to cut it. But I gave it a go and instantly hit a problem — you made it stitch by switching it on and off. There is a pedal, but like the machine itself its weeny and it didn’t really matter what pressure you put on it, the machine had two speeds, slow and slightly less slow. So to stitch, you hit on and to stop, you hit off. Which is great for Jack (but more on that later), but for me, urgh! It really did take some getting used to, for those of you who machine sew out there you will know that you get to know your machine, you know exactly what pressure to apply to the pedal for the speed you require without even thinking about it. Getting used to a new machine takes time, and I just didn’t have time with this, I wanted my old machine back!

I eventually managed to get the Name Banners done, and fortunately my machine broke at a time where I was planning to have some time off from work anyway, as Ed was in San Francisco for a week. So I popped my old machine on my desk and tried to put it out of my mind for a few days.

Having the little machine in our house was wonderful though, because (I am sad to say) the boys don’t get to touch my sewing machine. For one thing, reaching the pedal is a problem for them all. And it goes really fast — too fast for little hands. But the little machine meant that all three of them were able to use it, and make something entirely on their own. And that’s for tomorrow’s Blog post.

I did eventually brave going into a small, independent sewing machine repair shop a few miles from where I live who told me the machine could be fixed by just putting oil inside the holes located over your sewing machine and that would fix the problem — DON'T DO THIS! I didn’t, it just didn’t seem right, and having read a bit online it just wouldn’t have worked. No, what I did was manage to take off the whole of the needle plate with a little more patience and I was amazed at the amount of fluff under it. I gave the bobbin mechanism a little oil and things appear to be back to working order again, hoorah!

However, if your thinking of taking up sewing and don’t want to fork out £100+ on a machine, it really wouldn’t hurt you to give the little Hobbycraft one a try. It is frustrating when your used to a full sized machine, but it really does do basic stitching perfectly.